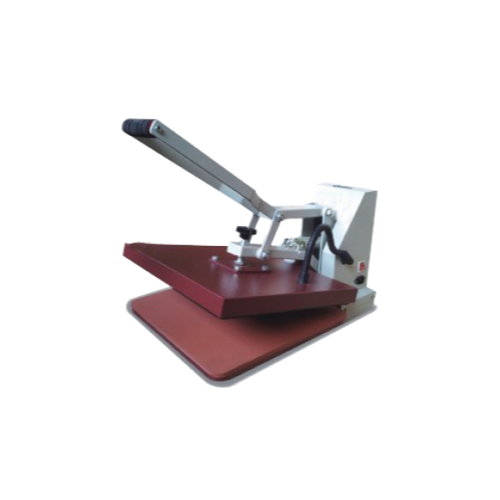
Heat Transfer Printing is the process of combining heat with a transfer medium to create personalized T Shirts or merchandise. Transfer medium comes in the form of vinyl (a coloured rubber material) and transfer paper (a wax and pigment coated paper). Heat transfer vinyl comes in various colours and pattern, from solid colours to even reflective materials and glitter materials. It is most commonly used to customise names and numbers on jersey. Transfer paper has no limiations to colours and designs. Individual artwork or image can be printed onto the medium with an inkjet printer to create shirts with your design! To finish off, vinyls or transfer papers are in a cutter or plotter machine to cut the design’s shape and transferred onto a T Shirt using a heat press machine.
Cialis es un tratamiento para la disfunción eréctil con efectos de gran duración. Permite tener relaciones sexuales espontáneas sin tener que planificarlas. En tal caso, ¡es hora de actuar de inmediato! Puede probar Cialis 5 mg https://cialis5mgdiario.com uno de los medios más famosos y efectivos para mejorar la potencia en la actualidad.
Advantages of heat transfer printing:
– Allows for different customization for every piece e.g. name customization
– Shorter lead time for smaller quantity orders
– Cost efficient for small quantity orders
– Able to produce high quality and complex graphics with unlimited options
Disadvantages of heat transfer printing:
– Time consuming and expensive for large quantity runs
– Prone to fading after prolonged usage and washing
– Direct ironing on prints will ruin image
Steps for heat transfer printing
1) Print your artwork onto transfer medium
Place trasnfer paper onto inkjet printer and print through the software of your cutter or plotter machine. Be sure to adjust your graphics to the size of the print desired!
2) Load printed transfer medium into cutter / plotter
After medium is printed, carefully load into plotter for machine to detect and cut shape of graphic
3) Removing excess parts of transfer medium
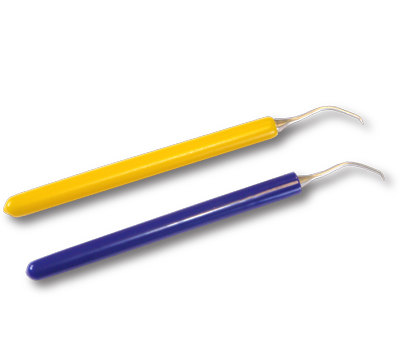
Once cutting is complete, remember to remove the excess or unwanted parts using a weeder tool. Be sure to double check on your artwok to ensure that no unwanted parts are left on the medium, and the print should look like how you want it to be on the T Shirt!

Weeding tool
4) Printing onto garment
Thinks to take note on heat press machine before printing:
- a) Temperature of heat press between 155’C to 180’C should be good. Optimum temperature depends on the transfer medium used and type of shirt / fabric
- b) Pressure of heat press. Medium pressure with contact will be sufficient to transfer prints onto garment.
- c) Duration of press. Extended duration might cause burn marks on your garment. Ensure to follow the instructions stated on your medium as well, for the right duration to ensure beautfiul and flawless printed shirts!
STEP 1:
Position apparel onto platen of Heat Press. Ensure that shirt is placed straight onto platen before printing, as a crooked placement will affect the position of the print!
Pre-press the garment with no prints on it with light pressure for approximately 2 to 3 seconds to remove any wrinkles which might get in the way of the print.
STEP 2:
Place your printed and nicely cut transfer medium (vinyl or transfer paper) onto t shirt. Check to make sure graphic is centralized and at the right position and angle before pressing! A crooked print will not look good!
STEP 3:
Double check on print and once it is good to go, lower the top layer of heat press to start heating. Once timer is up life the top layer up. Peel of the top layer of transfer medium. Be careful while doing so, surface of transfer medium is hot so handle with care. Your design is now printed and ready to wear!
Interesting facts about transfer printing
Transfer printing was introduced by John Sadler and Guy Green way back in the 1750’s. The technique was first developed to decorate ceramics, mainly pottery. The technique was well accepted and it quickly spread to other parts of Europe.
Back then, the process involved a metal plate engraved with decorative elements. The plate would be covered in ink and pressed or rolled over the ceramic. The process was slow and tedious compared to modern-day transfer printing, but it was still way quicker than hand painting on ceramic.
Later in the late 1940s, thermal transfer printing (a technique more commonly used today) was invented by a corporation called SATO, based in the US.


